Pemmican is a survival food with a long history of getting humans through insanely challenging situations. This article will show you how to make pemmican.
Telson Survival is a participant in the Amazon Services LLC Associates Program, an affiliate advertising program designed to provide a means for sites to earn advertising fees by advertising and linking to Amazon.com.
Telson Survival is supported by its readers. Please assume all links are affiliate links. If you purchase something from one of our links we make a small commission, at no extra cost to you. This helps us pay for the running of this website. Thank you for your support!
Pemmican is a survival food with a long history of getting humans through insanely challenging situations.
It is the meaty, greasy lifesaver that helped the natives of the North American continent survive for thousands of years.
If you plan on getting through an ice age, pack some pemmican for sure.
Most importantly, pemmican helps overcome two of the biggest challenges experienced in off-grid living:
Producing quality food with little or no specialized equipment
Making food that lasts
This article will show you the simplicity of how to make pemmican.
And, as a fun bonus, you’ll get a little history along the way.
Spend any time in the outdoors or getting through a power outage and you’ll miss your refrigerator.
Warm beer is a downer. Warm soda is just sad. And warm meat is, well, pretty soon going to rot.
So how did the Native Americans, mountain men, and sailors of yesteryear do it? They made food that naturally resisted bacteria and moisture.
Maybe they didn’t know that’s what they were doing, but they knew what worked. And pemmican worked.
Pemmican is simply a combination of finely ground jerky, rendered fat, and dried fruit or vegetables (doesn’t always have to include fruit or vegetables).
The finished product usually comes in the form of little balls or bars that can be easily used in recipes or eaten immediately.
Where does the word “pemmican” come from?
The word pemmican is actually derived from the Cree language, which was and is still spoken among the native people throughout Canada.
Other native groups ate versions of pemmican too, but it is the Cree word that became most used in popular culture.
Pemmican was one of the important native American survival foods.
It’s no wonder that pemmican was valuable; it could go where virtually no other food could and last the journeys that the fur traders had to make, mainly by canoe, across the vast waterways of Canada.
There’s nothing “hard” about DIY pemmican, as the process is simple. It just takes a little bit of time.
Budget a long afternoon for making pemmican and you’ll be good to go.
Pemmican ingredients
Let’s make about one pound of pemmican. Here’s what it takes to make a basic batch of beef pemmican:
1 pound of beef jerky (dried, lean meat)
1/2 cup of tallow/rendered fat (you may need a little more or a little less once you mix your ingredients)
About 1 teaspoon of salt
About 1 teaspoon of black pepper
1/8 cup of dried corn or dried berries (recommend blueberries)
NOTE: Dried berries or corn are not necessary. While they add some flavor and nutritional benefit, they will diminish shelf life to some degree.
Processing your ingredients
Let’s start with the jerky, the major ingredient in pemmican. If you just want to skip the step of making your own jerky and buy it, that is totally acceptable.
Just be aware that you don’t have the same kind of control over store-bought jerky that you do at home.
Also, buying jerky is way more expensive than making it yourself.
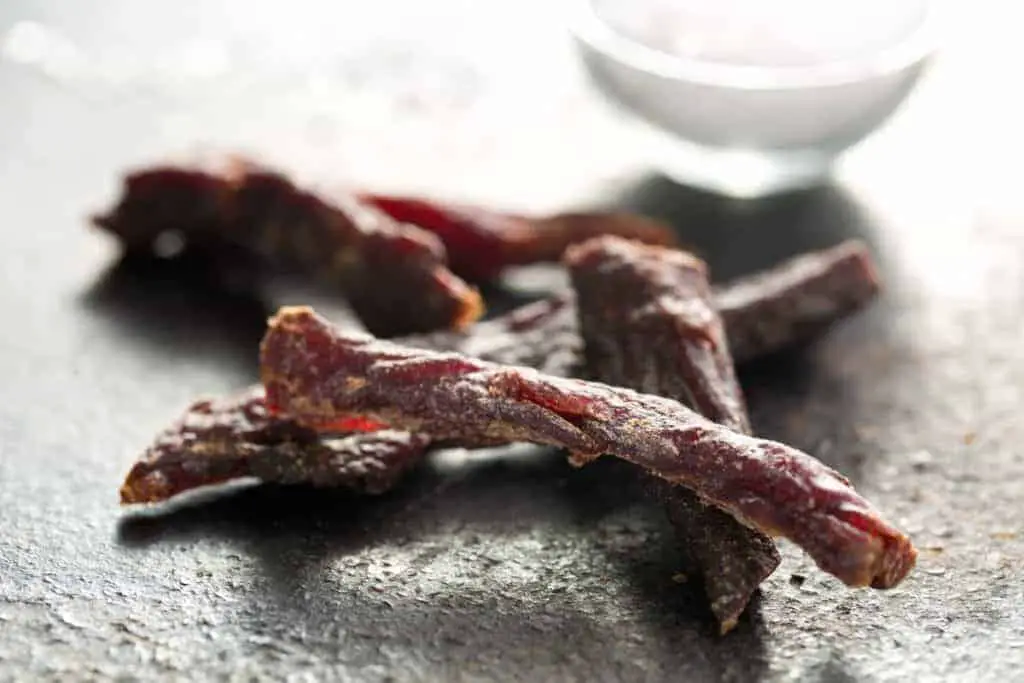
Making jerky
Jerky-making can be an art in and of itself, but you can quickly whip up a good batch, even if it is your first time.
It takes about 5 pounds of beef to render the pound of jerky that this recipe requires. Here’s what you do:
Get the leanest 5 pounds of beef you can find. Top round, bottom round, and flank are great cuts.
Trim as much fat as you can off your cuts of beef.
Slice your beef really thin—a little less than ¼ inch thick if possible and make 4-inch strips out of your meat, kind of like short strips of bacon (doesn’t need to be exact).
Work a few pinches of salt into/across all the beef strips with your fingers (helps preserve the meat).
Spread your strips out across your oven grates/wire racks and don’t overlap.
Place a catch pan or aluminum foil near the bottom of the oven (but not directly on the burners or heating elements) to catch drips from the beef strips.
Place your racks with meat in the oven and crack the oven open about 2-3 inches with a ball of aluminum foil.
Set your oven to a setting of 170-175 degrees Fahrenheit.
Expect to have the strips in the oven anywhere from 4-8 hours depending on the humidity and conditions of your home.
If it takes more than 1 rack to fit all the beef strips, rotate racks every couple hours for consistent drying.
Test out your beef strips after about 4 hours and then every hour after that by taking a strip out and bending it in half. When it is dry enough that it starts to crack when bent, then you know that strip is done.
NOTE: If a strip does not pass this final test, give it more time to dry. Stick with making this jerky on the drier side.
Grinding your jerky and/or berries
Now that you’ve made all that beautiful, tasty jerky, it’s time to grind it up! You are literally going to turn that whole pound of magical meat into powder.
If you have a blender with good dry mill blades or any sort of “bullet” or “ninja” style blender, they will work just fine.
Just throw the jerky in the blender and grind until you wind up with a stringy powder, about like sawdust.
If you opt for dried berries in this recipe, just grind them up the same way you would the jerky.
You can dry your berries in almost the same way you do jerky, but since it isn’t a requirement of pemmican, we won’t go in-depth. But it is relatively easy and you can get some solid instructions here.
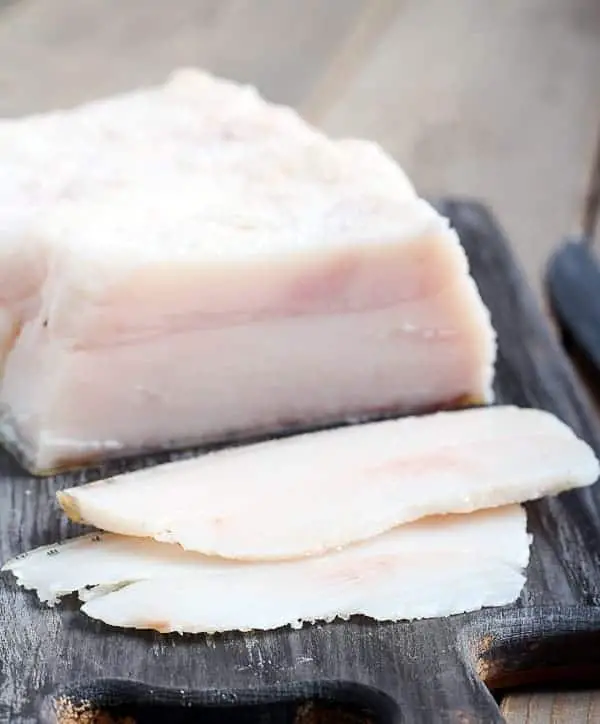
Rendering your fat to make tallow
Tallow is the other main ingredient in pemmican. Basically, tallow is raw animal fat (mainly from the areas that line and support an animal’s kidneys) called “suet” that has been cooked down.
Tallow is solid at room temperature and unlike suet, tallow can be stored without refrigeration. Tallow will remain safe to eat for years, as long as it remains covered/sealed to protect from moisture and contact with air.
If you can get it, you’ll save yourself a bunch of time by purchasing some tallow from your butcher or supermarket. But making it is not difficult, it just requires some patience.
Pickle jar or other sturdy cylindrical container that is airtight
Cheesecloth or any kind of porous fabric you can use as a filter
Cooking down the suet
Take your suet and chop it up into little chunks about the size of marbles
Put your suet chunks into a stock pot or high-walled skillet and turn the heat up to a little less than medium
Stir the suet chunks VERY FREQUENTLY, especially in the beginning of this process
Once the liquid/oil starts to come out of the fat, you won’t need to be quite so crazy with the stirring, but still, keep stirring pretty much the whole time you are cooking the suet
Keep doing this until the solid chunks have browned and are floating at the top of the liquid you have just created. Be patient. This can take an hour or more. Remember: overcooking and/or not stirring enough can burn the suet and ruin your tallow
Fish out the big chunks of fat that remain solid, you don’t need these
Allow everything to cool for about 10 minutes
Pour the contents of the pot through your straining cloth/cheesecloth and into whatever airtight container you wish to store the tallow in
It’s important to make sure your container is airtight. It keeps the tallow fresher for longer.
Once the tallow is totally cooled, it should be solid and white in color. Just scoop out what you need and warm it up a little to use in your pemmican or other recipes.
Mushing together all the pemmican ingredients
So, this last part is the most fun. Now that you have your pemmican ingredients processed and ready to go, the final step is to just combine all of them together in a big bowl.
Use nice clean hands to work the mixture until it looks uniform and form your pemmican into whatever shape you desire.
Important: Add your tallow a little bit at a time as you mix your ingredients.
If you add too much tallow, your pemmican will be too liquid. If don’t add enough, it will be too dry and will not stick together.
You want to stop adding tallow as soon as you are able to squeeze a lump of it in your hand without it falling apart the moment you open your hand again.
Many folks like to roll pemmican into balls, usually about the size of golf balls for storage. Still, some say that it is handier to roll their pemmican out onto sheets and then cut it into pemmican bars so that it stacks.
Regardless of how you form it, you will want to place your pemmican in some sort of airtight container and then place it in the freezer if possible.
Pemmican lasts at room temperature, but it lasts even longer if you freeze or refrigerate it, so why not?
Stay Prepared For Any Emergency!
If you like this article, consider subscribing to our free newsletter. We only send a few emails each month, with quality content related to Prepping and Survival, and absolutely no spam.
Thank you!
You have successfully joined our subscriber list.
If you are a visual learner, this outdoorsman offers a really nice video that follows essentially the same process detailed above.
How long does Pemmican last?
Pemmican can last a long, long time. At room temperature, pemmican that is sealed off from the elements can be expected to last for three years or more.
If you freeze it, it could even last double that time or longer. There are even some accounts of it remaining safe to eat for decades!
The thing with pemmican is that what you decide to put into it really affects the shelf life and there are so many recipes.
Keep in mind that the more fruit or vegetable products you add to your pemmican, the more it might want to degrade/spoil.
How to eat your pemmican
Pemmican is pretty versatile stuff. It actually adds a good amount of flavor to any dish when you are camping out.
From soups and stews to any sort of sautéed or pan-fried meal, you can add pemmican to get the flavor and calorie content you need to keep you going.
It is also quite edible all on its own and requires no cooking to be safe to eat.
That’s one of the reasons it was such a big hit with the trappers and mountain men in Canada and the early United States.
It basically served as the original protein/energy bar. And while the concept of eating rendered fat mixed with jerky is a hard sell on today’s generation, it still deserves a spot toward the top of the “power foods” list.
Plenty of hunters, hikers, and outdoor enthusiasts still pop pemmican in their mouths while on their journeys.
A historically-inspired recipe that uses pemmican
One of the most common ways to eat pemmican, for both the natives of North America and the European settlers, was to use it in a soup.
The recipe you see below includes BacOs (yes, the imitation bacon bits), and the author thinks it tastes amazing!
The soup you are going to make is a creative version of “rubaboo”, a traditional dish of Native American origin made with pemmican and basically whatever you have on hand!
1/2 pound of pemmican cut into marble-sized chunks
1½ quarts of water
1/4 cup of BacOs
1/4 pound of ground ship’s biscuits (half a cup of flour works fine too)
2 large carrots cut into coins
1 large potato, cut into medium-sized chunks
1 large onion, cut into medium-sized pieces
1 tablespoon of salt
1 tablespoon of black pepper
2 tablespoons of coriander seeds
Putting your rubaboo together
With all your ingredients assembled, all you need to do is bring your water to a boil and throw everything in.
As soon as the veggies are as soft as you like them, it’s time to eat.
Also, if you find that the soup is too thin, you can always throw in some more ground up ship’s biscuits or flour to thicken it up.
If you want to use any fresh greens, like spinach or kale, but you don’t want them to be too soft, just wait until the other veggies are almost finished cooking before including them in the soup.
And that’s it! There isn’t too much to overthink or prepare.
Obviously in a survival situation you might not have all these ingredients, but be creative and you can still make something that fills you up and doesn’t taste half bad.
The historian in this video is really into making things authentic per the 1700s, but if you have a creative idea, go for it!
Is pemmican healthy?
With all the calories packed into a food like pemmican, it’s easy to see why some folks might be slow to recognize it as nutritious.
But pemmican is really a tool of survival. Like any tool, if used in the wrong situation or for the wrong job, it is useless or even dangerous.
You wouldn’t use a jackhammer to perform a root canal for example...that would be dangerous. But that doesn’t mean that jackhammers are bad. The same goes for pemmican.
Depending on the particular recipe, a 5-ounce hunk of pemmican can easily contain over 800 calories.
But keep in mind, every pemmican recipe will create food that is a little nutritionally different.
So, yes, pemmican is a high-calorie food.
However, it needs to be in order to serve its purpose. If you plan on making this stuff to eat while sitting in front of a TV playing Call of Duty, you are definitely not going to do your body any favors.
For someone who is hiking and living in the outdoors, his or her caloric needs may be double what you would normally need.
It wouldn’t be unthinkable to burn through 4,000 calories a day with a full pack of gear as you hike through the Rocky Mountains during the winter months; whereas in civilization, we typically only require around 2000 calories each day as we go about our lives.
Take a look at the US military’s “meals ready to eat” (MREs) and you’ll see the same philosophy around calories.
The creators of MREs are basically trying to create the most compact food possible, while cramming in as many calories imaginable, and having it not taste horrible.
Soldiers burn an insane amount of calories in the field, so regular foods in regular portions don’t always make the grade.
In a way, pemmican is one of the “original” MRE foods and, when you make it yourself, it can last as long as military-issued rations without any crazy preservatives. For more MRE nutrition info, take a look at this page.
Why your fat sources matter
If you followed the steps above to make your pemmican, you successfully rendered beef fat into “beef tallow”.
We call this rendered fat “beef tallow” because, well, it comes from cows. However, you can get rendered fat from whatever animal you slaughter, but it might be called something else.
Here’s what rendered fat is called, depending on the source:
Beef, bison, caribou, deer, or elk, fat is rendered into beef, bison, caribou, deer, or elk “tallow”
Pork fat is renedered into “lard”
Chicken or goose fat is rendered into “schmaltz”
Milk fat is rendered into “clarified butter” or “ghee”
Now it would seem like all fats should be interchangeable, but when it comes to preservation, safety, and consistency—not all fats are equal.
First off, it actually matters what type of diet your source animal ate. The basic rule of thumb is that the more natural an animal’s diet, the better the fat will be for your pemmican.
So, if you take down a wild caribou and harvest its suet, you should have a super-high-quality tallow once the rendering process is done.
But if you go to the supermarket and buy some beef suet or tallow from corn-fed cows, you might not get the ideal product you are after.
However, it will still be usable, but some survival experts have noticed that corn-fed beef tallow may:
Not keep its shape as well at room temperature
Have a strange aftertaste
Not bind the little particles of food together as well as it should
If all you can get your hands on is corn-fed beef suet or tallow, it’s not a deal breaker.
It will still last and will still serve its purpose if prepared correctly. Just keep in mind that grass-fed suet is the gold standard.
What about the other kinds of tallow/rendered fat?
Any of the game mammals listed above are going to work just fine. Pemmican from deer meat is especially tasty.
However, when you get into “softer” animals, the final product may really under perform.
While you could technically make pemmican from any of the other fats, you are better off staying away from using rendered chicken/goose, pork, or milk fats.
The problem is that none of these types of fat want to remain very solid at room temperature.
Additionally, they tend to go rancid much faster than your alternatives, which defeats their purpose in pemmican altogether; the bottom line is to avoid these fats when making your pemmican.
Get cookin’ pemmican now!
When it comes to cooking, the best way to learn is to just do it.
There are too many weird little tips and tricks to even list in this one article and you will stumble upon many yourself as you give these foods a try.
The best thing about learning how to make pemmican is that this one food really helps you cover many of your nutritional needs from a daily calorie perspective.
Woodsman of days gone by have literally survived on nothing but pemmican for months on end. Plus, you need no specialized equipment to make it correctly.
In survival and prepping, there are many “big opinions” about what is good or bad.
But when it comes to survival, it can’t always be black and white because you are going to have to adapt. See what works for you.
Try making small batches of pemmican first and see what kind of issues you encounter with prep and storage WHERE YOU LIVE.
Someone who lives in Alaska might have storage concerns that are very different when compared with someone living in the Florida Everglades for example.
The sooner you start on projects like these and figuring out what your specific needs and challenges are, the sooner you’ll be prepared for whatever this world throws at you.
We´ve created this comprehensive guide to help you understand all about freeze dried survival food. In this article we answer 16 questions preppers may have around freeze drying.
In this article we´re going to lay to rest any doubts or confusions preppers may have about freezing food. We´ll also let you know which are the best survival foods for freezing and how long you should keep them stockpiled.
In this article, we´re going to dig deep into the advantages of having a prepper freezer. We will also give you our recommendations for the best ones to store your food for long term survival.
We argue that storing meat without refrigeration is one of the most important skills every prepper needs to learn. In this article we talk about several methods to store meat long term even if you don't have a freezer.