How to Clean Survival Tools [Care and Maintenance of Cutting Tools]
In this article we discuss four primary ways to keep your sharp survival tools in a top-tier condition: cleaning, sharpening, oiling and storing.
Telson Survival is a participant in the Amazon Services LLC Associates Program, an affiliate advertising program designed to provide a means for sites to earn advertising fees by advertising and linking to Amazon.com.
Telson Survival is supported by its readers. Please assume all links are affiliate links. If you purchase something from one of our links we make a small commission, at no extra cost to you. This helps us pay for the running of this website. Thank you for your support!
As a survivalist, you need your survival tools to be in tip-top condition at all times. In a survival situation, you want a tool that will work efficiently because your life might depend on it.
Thus, you have to know how to clean survival tools, sharpen them, lubricate them, and store them to ensure that they are always in an optimal condition.
The care and maintenance of cutting tools is as easy as it can get. For one, you have to be aware that like all metals, stainless steel is subject to rusting if exposed to moisture for an extended period.
Rust can singly destroy a cutting tool within no time at all, which is why it is the one thing that you should be very wary of.
On top of being rust-free, the edge of your blades should be so sharp as to make easy and clean cuts.
In the real sense, a blunt tool is more of a liability than an asset as you can injure yourself more easily.
In this article, we shall discuss four primary ways to keep your sharp survival tools in a top-tier condition.
In a hurry? If you just want to get to our conclusions, here are our top picks and recommendations!
Why You Need to Care for And Maintain Your Survival Tools
A well-maintained tool performs optimally as required and may save someone in life and death situations.
Cleaning your tools keeps them in good shape and increases their life-span and level of productivity.
A dry blade is also safe from the adverse effects of rust. Rust is the worst threat to the efficiency of tools as it slowly eats away at the metal rendering the tool useless over time. It is, therefore, essential as a survivalist to know how to clean survival tools
Blunt tools are difficult and extremely dangerous to work with. For one, one needs to exert more force to get the job done. Also, instead of cutting through, they tend to bounce off surfaces. This is very risky as it may slip and cut into your shin, hurting you badly.
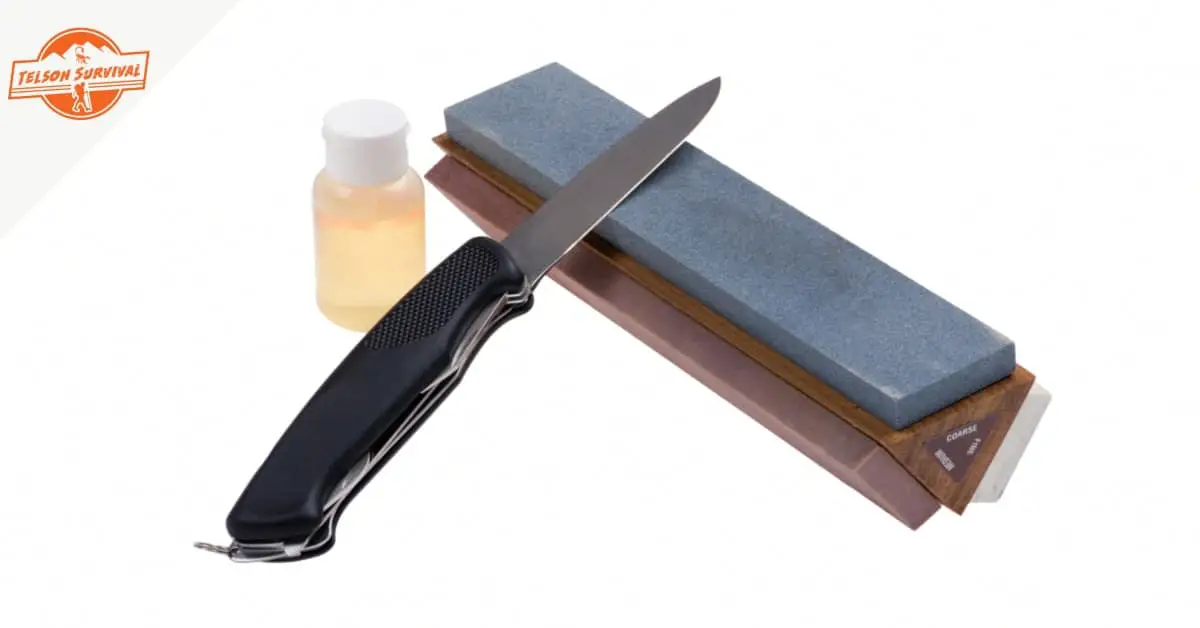
Cleaning Survival Tools
Every time you use a sharp survival tool, the blade gets in contact with nature, dirt, moisture, and sap from trees remain on the blade. If you know how to clean survival tools, you will you must be aware that special attention needs to be placed on the blade.
Start with wiping the blade using a dry or slightly damp rag. Ensure you have gloves on when wiping to avoid getting cut by the sharp edge. For bigger tools such as axes, you may use steel wool and acetone to get rid of the dirt.
It is advisable to clean immediately after use as delaying will provide enough time for the dirt to stick on the blade, making it harder to clean. Cell sap, for instance, is one of the hardest things to remove when it sticks on the steel.
Taking too long to clean will also provide enough time for the moisture on the blade to form rust.
Stainless steel is only rust-resistant and not rust-proof, which means it is not entirely safe from corrosion. Hence, it is advisable to refrain from submerging the tool in water while cleaning. In the event you do, make a point of drying it as fast and as thoroughly as possible.
After the blade, clean the handle using a damp rug if it not too dirty. If it needs a more thorough cleaning, steel wool and turpentine will get the job done. If called for, you can smoothen it using sandpaper.
Before storing, apply a thin layer of 3 in 1 oil to keep it dry. Other survival blade oils you can use are gun oil, ballistol, linseed oil, and various mineral oils available on Amazon and local stores.
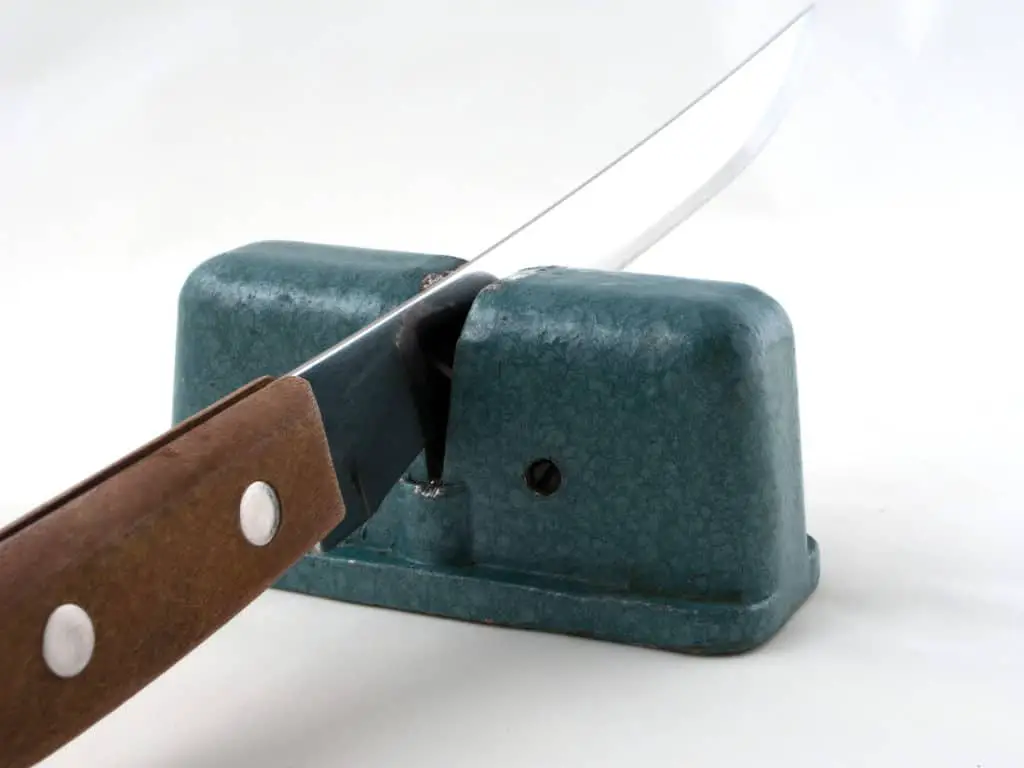
Sharpening Bladed Survival Gear
If you want a tool that will deliver right on demand, it has got be sharp enough to make clean, unmistakable cuts. Still, it is inevitable for a cutting tool to become dull after prolonged use.
The best way to keep your survival knife or hatchet sharp is by sharpening it as often as possible. The basic concept behind sharpening a tool is getting rid of any extra material to leave a smooth sharp edge, more or less like pruning a tree to make it functional again.
Stay Prepared For Any Emergency!
If you like this article, consider subscribing to our free newsletter. We only send a few emails each month, with quality content related to Prepping and Survival, and absolutely no spam.
Thank you!
You have successfully joined our subscriber list.
Before sharpening your tool, it is essential to first make sure that it is clean, then you can proceed with the following:
Examine the sharpness of the survival tool. This will enable you to determine the correct sharpening angle depending on how sharper the tool should become. Look out for manufacturer’s instructions for specific guidelines.
Inspect the edges of the blade. If the blade has bends or cracks, smooth that out using a hammer if it’s an axe or a hatchet. Then, proceed to file the blade in a vertical motion as you go along the blade's length.
For bigger tools such as a hatchet, secure it firmly before you start filing to avoid accidents. For the smaller ones, hold them in position and begin the sharpening process. For the best results, invest in quality blade sharpening tools such as files and sharpening stones such as the whetstone.
There are different kinds of whetstones, each with its own purpose, so ensure that you get the perfect whetstone for your tool. Combo whetstones are the most convenient as they have both the coarse and fine sides in one stone.
To use, wet the whetstone thoroughly by soaking it in blade sharpening oil or water, to act as a lubricant during the sharpening process. A wet whetstone also carries away the grit during the sharpening process.
For smaller tools like the survival knife with minor deformations, a honing steel would also come in handy. Hold the knife firmly and give it 4 or 5 strokes on each side to get it into optimal cutting shape.
Test the sharpness of the blade to see if it is as sharp as it was intended. You can do this by passing a paper over the edge of the blade- if it snags and cuts the paper, you are good to go.
Another way is holding the cutting edge to a light source. If light reflects on the blade, go back to filing until it doesn't. To make sure it is sharp enough, put the blade through the ultimate test- cutting, chopping and splitting. If it makes clean, sharp, easy cuts, the blade is sharp!
Add a coat of blade oil to finish off and to prevent rust from building up.
Never let your cutting tools become blunt. Always examine the tools to ensure the blades are sharp. Avoid activities that make your blades dull, such as sticking them into dirt, or using them for things they were not made for.
Also, use a soft cutting surface when chopping or cutting, as hard surfaces blunt out cutting edges of a tool. When not in use, keep it in a sheath to protect it from external elements, like rust, that may make it blunt.
Check out this video explaining how to sharpen a survival axe in your wilderness basecamp.
Lubricating Survival Tools
It is advisable to oil your sharp survival tools as often as you can as it can prevent moisture accumulation, which hinders rusting from occurring. Rust forms when moisture comes into contact with a metal surface and oxidizes.
As we all know, oil and water do not mix, and that is why it is well-suited for this task. Blade oil forms a protective coating that prevents moisture from coming into contact with the metallic surface. The more you oil the tool, the safer the blade is from getting corroded.
Oiling is not limited to the blade. The handle also needs to be oiled ever so often to protect it from absorbing water and cracking. The best oils for lubricating blades are those that are biodegradable, non-toxic, general-purpose, and affordable. The most used oils for survival tools are:
Gun oil- It is excellent for metal parts, be it stainless steel or carbon steel. It effectively removes light stains on the blade and dries it up, driving away moisture, thus preventing rusting. Care should be taken for it to not come into contact with the wooden part. When applied, leave it to dry in a safe place.
3-in-1 oil- It is the ultimate lubricating oil for most tools, as it is general-purpose and non-toxic. It effectively protects a metallic blade from rusting and prevents a wooden handle from cracking.
Ballistol- This is a general-purpose, non-toxic oil that is as good on the wood as it is on the blade. It works on every tool that you may own: survival axes, guns, wood, leather, knives. On top of that, it is non-toxic and biodegradable.
Boiled linseed oil- It is perfect for applying on wooden handles. Use a rag to carefully apply the oil on the handle until the wood cannot absorb any more. Wipe off the excess oil and leave the wood to dry. For this purpose, linseed oil should be boiled because raw linseed oil does not dry and will remain sticky at best. Linseed oil is spontaneously combustible, so anything that has come into contact with it should be promptly disposed of.
To lubricate a tool, use a clean rug to apply oil on both the metallic blade and the wooden handle of a tool. Rub the oil on the surfaces to ensure it has been absorbed effectively by all parts of the tool.
Pay special attention to the metallic bits, especially those that may not be made of stainless steel, such as the screws. Then, wipe off the excess oil and let it dry.
If needed, apply a second coating of oil to the handle. Be careful not to over-do it to a point where the handle slips off your grip when in use.
Where you store your tools is detrimental to the quality and longevity of your tools. To begin with, a good storage room should be clean and dry to protect the metallic bits from corrosion.
When storing knives, axes or survival hatchets for an extended time-frame, it is advisable not to cover the blades in sheaths, especially if they are made of leather.
This is because, over time, sheaths tend to sweat, and as we know, moisture is a threat to the survival and functionality of metallic blades.
On that note, storage areas should be shielded from direct sunlight. Heat may potentially dry out the wood causing it to crack.
How to Remove Rust from Blades
As mentioned, stainless steel is not entirely devoid of rust, so the tool may get corroded every once in a while. If that happens, don't throw away your tools.
There are ways to get rid of the rust at the comfort of your home, using easily available ingredients. Some of the most common methods of removing rust from blades are:
Use of Vinegar- Vinegar contains acetic acid, which is very effective in removing rust from metals. Furthermore, it is economical as vinegar can easily be found in homes or at affordable prices in stores. To remove the rust, dip steel wool in vinegar and scrub the rust away. Alternatively, create a solution of vinegar and water then submerge the rusty tool for about 24 hours. On the next day, rinse the tool and wipe it clean to reveal a blade that is as good as new!
Use of lemon- The citric acid found in lemon does wonders when scrubbed on a rusty metal surface using steel wool. For best results, use a mixture of lemon and salt, and let it stay on the tool a couple of hours before scrubbing it off.
Baking Soda- Although not as effective as using vinegar and lemon, applying a paste of baking soda on the rusted area also bears positive results. For best results, leave the paste on the area for a couple of hours.
Survival Gear Maintenance Products
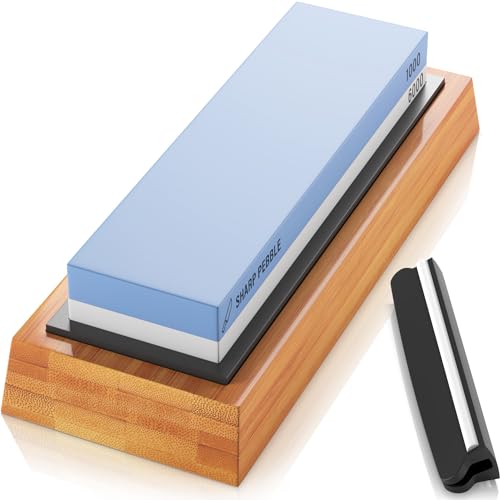
Sharp Pebble Premium Whetstone
If you want your tools to stay sharp always, then the Sharp Pebble Premium Whetstone is your go-to sharpening stone. It is double sided, meaning you can sharpen your tool using either side of the stone.
The multipurpose aspect of it allows you to sharpen any type of tool you may have: axes, machetes, survival knives or hatchets. Thus, you will not have to buy an assortment of sharpening tools, which is very convenient.
The Sharp Pebble Premium Whetstone has a silicone base to hold the stone steady inside a non-slip bamboo base, making it safe to use. It is extremely easy to use and only requires water as a lubricant during the sharpening process.
The quality of this sharpening stone is top-notch and it will last you a long time. To ensure you use it correctly, it comes with a simple instruction manual that also has tips and tricks that you can use to make the most of the product.
Get this tool today and watch as your tools become sharper to serve you better.
Last update on 2024-12-12 / Affiliate Links / Images from Amazon Product Advertising API
Pros
It is affordable
It is durable
It is multi-purpose
It is easy to use
Cons
It may get ruined without maximum care
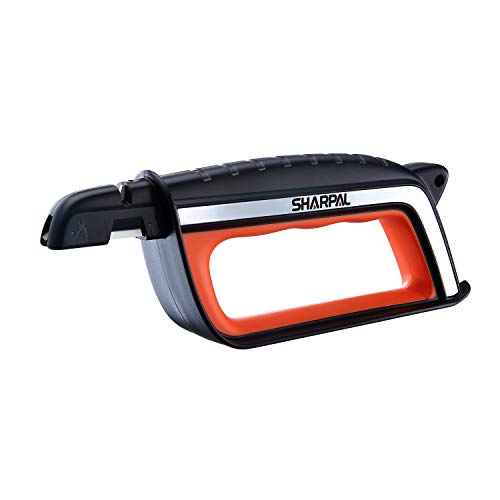
SHARPAL 103N All-in-1 Multi-Sharpener
This is the most versatile sharpener in the market as it can sharpen and hone both single and double bevelled blades. Thus, you can use it to sharpen virtually all the sharp tools in your survival kit: machetes, hatchets, axe, survival tomahawks.
It is built to give tip-top performance with its 5 sharpening parts that include 3 slots of pre-set optimal sharpening angles. It is made to last as it made with quality, abrasive materials. So, you may never have to buy another sharpening tool in a lifetime.
You do not have to worry about getting cut or bruised while sharpening your tools, as the SHARPAL 103N All-in-1 Multi-Sharpener has a handle big enough to accommodate gloves.
It also has a large hand guard that will protect you from the blades. With a price as affordable as it costs, this is a good and effective tool to own.
Last update on 2024-12-12 / Affiliate Links / Images from Amazon Product Advertising API
Pros
It is affordable
It is versatile
It is easy to use
It is safe to use
Cons
It could use more suction power
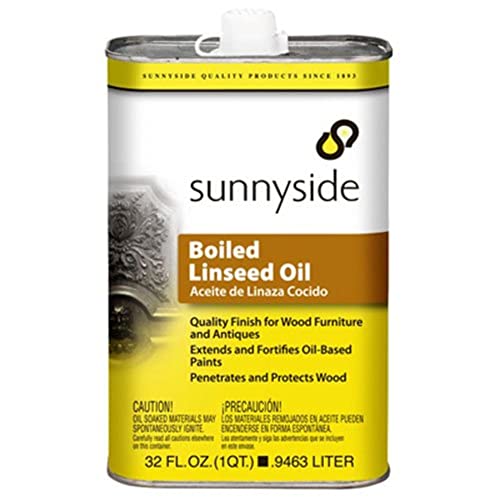
Sunnyside Corporation 87232S Boiled Linseed Oil
This is one of the best oils to apply onto your wooden tool-handles. It penetrates the wood uniformly and adequately, creating a quality finish. It enhances the wood and protects it from drying up and cracking.
The process of application is easy as you are only required to smear the oil using a rag until the wood absorbs the oil fully.
After wiping out the excess oil, you should put the tool in a safe place and give it 12 to 18 hours to dry up, depending on the conditions.
Last update on 2024-12-12 / Affiliate Links / Images from Amazon Product Advertising API
Pros
It is affordable
It is extremely easy to use
Provides quality results
Cons
It is combustible and may be dangerous if not handled with care.
Sharp Survival Tools Maintenance FAQs
How do I keep blades from rusting?
Rust forms when the blade comes into contact with moisture in the form of water, sweat, and even humidity.
The best way to prevent this contact is through oiling your blades. It keeps them dry and keeps moisture from penetrating through to the metal. Also, where you store your tool matters. It should be completely dry and clean.
It is highly recommended that you hang your tools on the wall in the storage room instead of putting them on the floor. Finally, invest in a good survival blade sheath to be covering your blade when not in use.
How do I remove rust from a knife blade?
Start by cleaning the knife in case it is dirty. Then, submerge it in a water and vinegar solution for a day before rinsing it and oiling it.
Alternatively, scrub it off using steel wool that has been dipped in vinegar. Other products that can take the place of vinegar are lemons and baking soda.
When done, make sure to oil the blade to prevent rust from re-occurring.
How should the blade oil be used?
Use a rag or a brush to carefully and thoroughly apply the oil all over the blade. When each side of the blade is coated in oil, wipe off any excess.
Put the tool in a safe place and let the oil dry. If necessary, apply a second coating of oil.
Bladed Survival Gear Care Conclusions
Every time you step out to go camping or for other outdoor adventures, always keep in mind our made-up saying, "you are as sharp as your knife."
That is to say that if you came face to face with a bear with a blunt hatchet, you are as good as dead unless a miracle happens.
You should also know how to clean survival tools if you want them to serve you most optimally and be prepared for any survival scenario.
Remember that a survival tool will take care of you if you take care of it, so invest in a quality blade maintenance kit to provide the best care possible for your prepper gear.
A flare gun is a pistol-like device that fires flares for signaling or illumination in emergencies. This article will help you decide what the “right” flare gun is for preppers!
Urban, suburban, rural, and wilderness preppers should all study and master survival foraging. This basic foraging guide will get you thinking about finding survival foods in the wild.
No stone will be left unturned as we explore everything preppers need to know about smoke grenades. What are the best to buy and should you keep them in your Bug Out Bag?