How to Build Shelter in the Wilderness (11 Types of Shelter Explained)
In this article you will learn about 11 types of survival shelters that could save your life in a wilderness survival scenario.
Telson Survival is a participant in the Amazon Services LLC Associates Program, an affiliate advertising program designed to provide a means for sites to earn advertising fees by advertising and linking to Amazon.com.
Telson Survival is supported by its readers. Please assume all links are affiliate links. If you purchase something from one of our links we make a small commission, at no extra cost to you. This helps us pay for the running of this website. Thank you for your support!
Stories of survival in the wilderness are not uncommon.
You might have heard of the 30-year-old Tyson Steele who survived the harsh cold of the Alaskan wilderness for three weeks before being rescued.
He initially sheltered in a snow cave and then put together a tent from scrap material.
There’s a lot in the rest of Tyson’s story that indicates he had plenty of knowledge about how to build a survival shelter, most of which he says he learned by being in the outdoors and watching Youtube videos.
What would happen to you if you were in Tyson’s position? Freeze?
Hopefully not. But your survival would depend on your ability to make a cold weather survival shelter.
This article will save you the freezing fate by telling you how you can make or identify a natural extreme weather survival shelter.
We also tell you about the skills you need to learn so you can make your emergency shelter and the type of survival shelter that works best in different survival situations.
Let’s get you started with a quick overview of survival shelters.
Why You Should Learn to Build Extreme Weather Survival Shelters
Extreme weather survival shelters in the wilderness include any structure that occurs naturally or which is purposely erected to protect you from the hostile effects of harsh weather conditions.
These shelters will also protect you from wild animals, insect bites, or other dangers that would befall if you were exposed in the open.
Whether you find yourself stuck in the wilderness under extreme weather by accident or you are in the woods by choice for a leisure escapade, knowing how to build a survival shelter could be your life-saving ticket.
But, staying alive is not the only benefit of survival shelters.
Especially if you are in the wilderness on a relaxation or adventure trip, having a survival shelter will help you enjoy your trip better if you know that you have a place to return to and protect yourself from extreme heat, cold, wind, or rain.
If your survival need is instead an emergency, having a shelter sustains your motivation to come out of the situation alive against all odds.
If having a shelter is so crucial, learning some basic skills for making a survival shelter is equally essential. So, what basic skills should you have?
Here are some of the basic skills you should acquire to help in creating survival shelters in the wilderness.
Learn to improvise
If you find yourself in the wilderness and in need of a survival shelter, you’ll have to make do with what you have.
This means utilizing material that is available in the wilderness to make a shelter and keep yourself warm or protect yourself from heat. Take snow, for example, we always think that snow is cold. But snow can help you stay warm and survive as we shall be showing you later.
Other ways you can improvise shelters include:
Creating and using bark straps to tie rods together.
Using tree barks, branches, leaves, and grass to make roofing or create a wind barrier.
Using trees as your shelter’s foundation to make it resistant to the elements (wind, rain, etc.).
Learn to make knots
Unless you are going for a planned escapade and are willing to bring a heavy load of nails, knowing how to tie knots is indispensable when it comes to making a survival shelter.
There are many types of knots that you can make depending on the function you want them to serve. Here is a list of the most useful survival knots:
The overhand knot creates a basic loop and can join two short cords to make a longer one.
The clove hitch will help you tie a rope to a tree or post and you can undo it easily.
The half hitch ties a cord tightly to a post and is good for a long-term survival shelter.
The reef / square knot will help you connect two ropes.
A tensioning hitch will serve to tighten a loose element in a tarp or ridge line.
A ratchet knot anchors a ridgeline.
The prusik knot / friction hitch fastens a small cord to a ridge-line at a 90o
For more detailed video guides on essential knots for shelters and tarp setups, check out this video from MCQ Bushcraft & Wilderness Life.
Learn how to tie a lashing
Lashing secures two poles together, usually at a right angle (square lashing). But diagonal lashing can also be done.
There are several uses for a lashing:
You can lash poles together to hold a tarp for an A-frame or lean-to shelter (as explained later in the ‘types of survival shelter’ section).
Square lashings can be used to make a raised bed with sticks or to put together a ladder.
If the ground is a little flooded, the lashing skill will come in handy when you are trying to figure out how to make a mud fireplace. Simply lash sticks on two poles to create a platform similar to a table and pile a layer of mud, enough to protect the wood from burning. Smooth the mud and make the fire on top.
Stay Prepared For Any Emergency!
If you like this article, consider subscribing to our free newsletter. We only send a few emails each month, with quality content related to Prepping and Survival, and absolutely no spam.
Thank you!
You have successfully joined our subscriber list.
Learn rescue codes to include in survival shelters
When you are lost or stuck in the wilderness, getting help is part of survival. You can include signs that will draw attention to rescuers when making survival shelters.
Here are some rescue signal examples:
Erecting a post with a rescue flag at the top of your shelter.
Spreading a cloth with shouting colors at the roof of your survival shelter.
Using material with a contrasting color to inscribe S.O.S on the roof of a snow cave. The code is used internationally to signal distress and the need for help.
With these skills, you can now learn how to build a shelter step-by-step.
These steps include: identifying a suitable spot, assessing your shelter needs, and making the appropriate survival shelter.
While you can build a wilderness shelter with just natural resources, your job will definitely be harder without some survival tools. We encourage you have a look over our wilderness survival kit for our bushcraft gear recommendations.
Identifying a Survival Shelter Spot
Identifying an appropriate spot for your shelter is crucial. Certain factors should be born in mind when choosing a spot.
Chose a dry spot. This will protect you from dampness especially if it is raining or about to rain. A dry spot will also facilitate starting a survival fireplace.
Choose a flat place. If you make your survival shelter on a slope, you risk flooding or having your shelter carried away by the flow. If you can’t find a flat place, dig a trench on the upper side of your shelter, deep enough to collect the water and drain it away from your shelter.
Stay away from water bodies. Not too far away that you don’t have access to the water when you need it, but away enough to be safe from possible flooding should its banks break.
Don’t choose spots under cliffs or caves with loose roofs and falling rock. Rain and snow could accelerate the falling of rocks.
Avoid making your shelter under dry tree limbs and branches as these will break easily in the event of strong winds or a storm.
Depending on the purpose of your shelter, choose a hidden spot if you don’t want to be readily spotted and an open, easy to find spot if you are seeking to be rescued.
If you are in a desert, choose a position that will protect you from strong winds like the side of a hill that is against the wind.
With your shelter spot identified, you will then need to assess your shelter needs.
Evaluating Your Shelter Needs
To decide on the type of survival shelter that you need, you will need to assess your shelter needs.
Here are some of the questions that you should answer.
Why do I need a shelter?
This question will be assessing whether your shelter is a hideout or one intended for easy spotting, if it a short-term or long-term protection shelter from the elements, or if it is a temporary residence during a get-away escapade in the wilderness.
For how many people are you making a shelter?
If you are with another person, you’ll need to make a shelter with more space.
However, keep just the minimum space that lets you be comfortable since extra space will mean more difficulty to preserve the heat in cold weather.
If you are a group, make more shelters with a few people in each.
What specific requirements are dictated by the weather?
If you cannot make an insulated survival shelter that will naturally protect you from cold, making a fire will be necessary.
Also, if it is extremely windy, you will need to make a wind barrier a meter or so from your shelter.
If it’s rainy, you will need to find a spot with natural roofing or make a shelter with dense roofing to keep away the rain.
How much time do you have to make the shelter?
If the storm is already announced, you may have barely 10 minutes to create a shelter.
In such a case, you are better off finding a natural survival shelter near you such as secure caves or strong trees with thick canopies.
With more time, build a shelter that is strong enough to withstand the elements.
Do you have the needed resources?
Referring back to the improvising skill, opt for a survival shelter that can be made with the resources available around you.
The Australian Government advises that you use survival shelter resources that do not require much physical effort to obtain while at the same time ensuring you make a strong shelter that keeps you safe.
With the spot for the shelter identified and the shelter needs already evaluated, you can now choose one of the types of survival shelters from the wilderness survival shelter designs below.
How to Build Shelter in the Wilderness: 11 Types of Survival Shelters
These 11 types of shelter in the wilderness will either protect you from the cold in winter, shield you from the heat in hot weather, keep you dry when it rains, or offer protection from insects and animals.
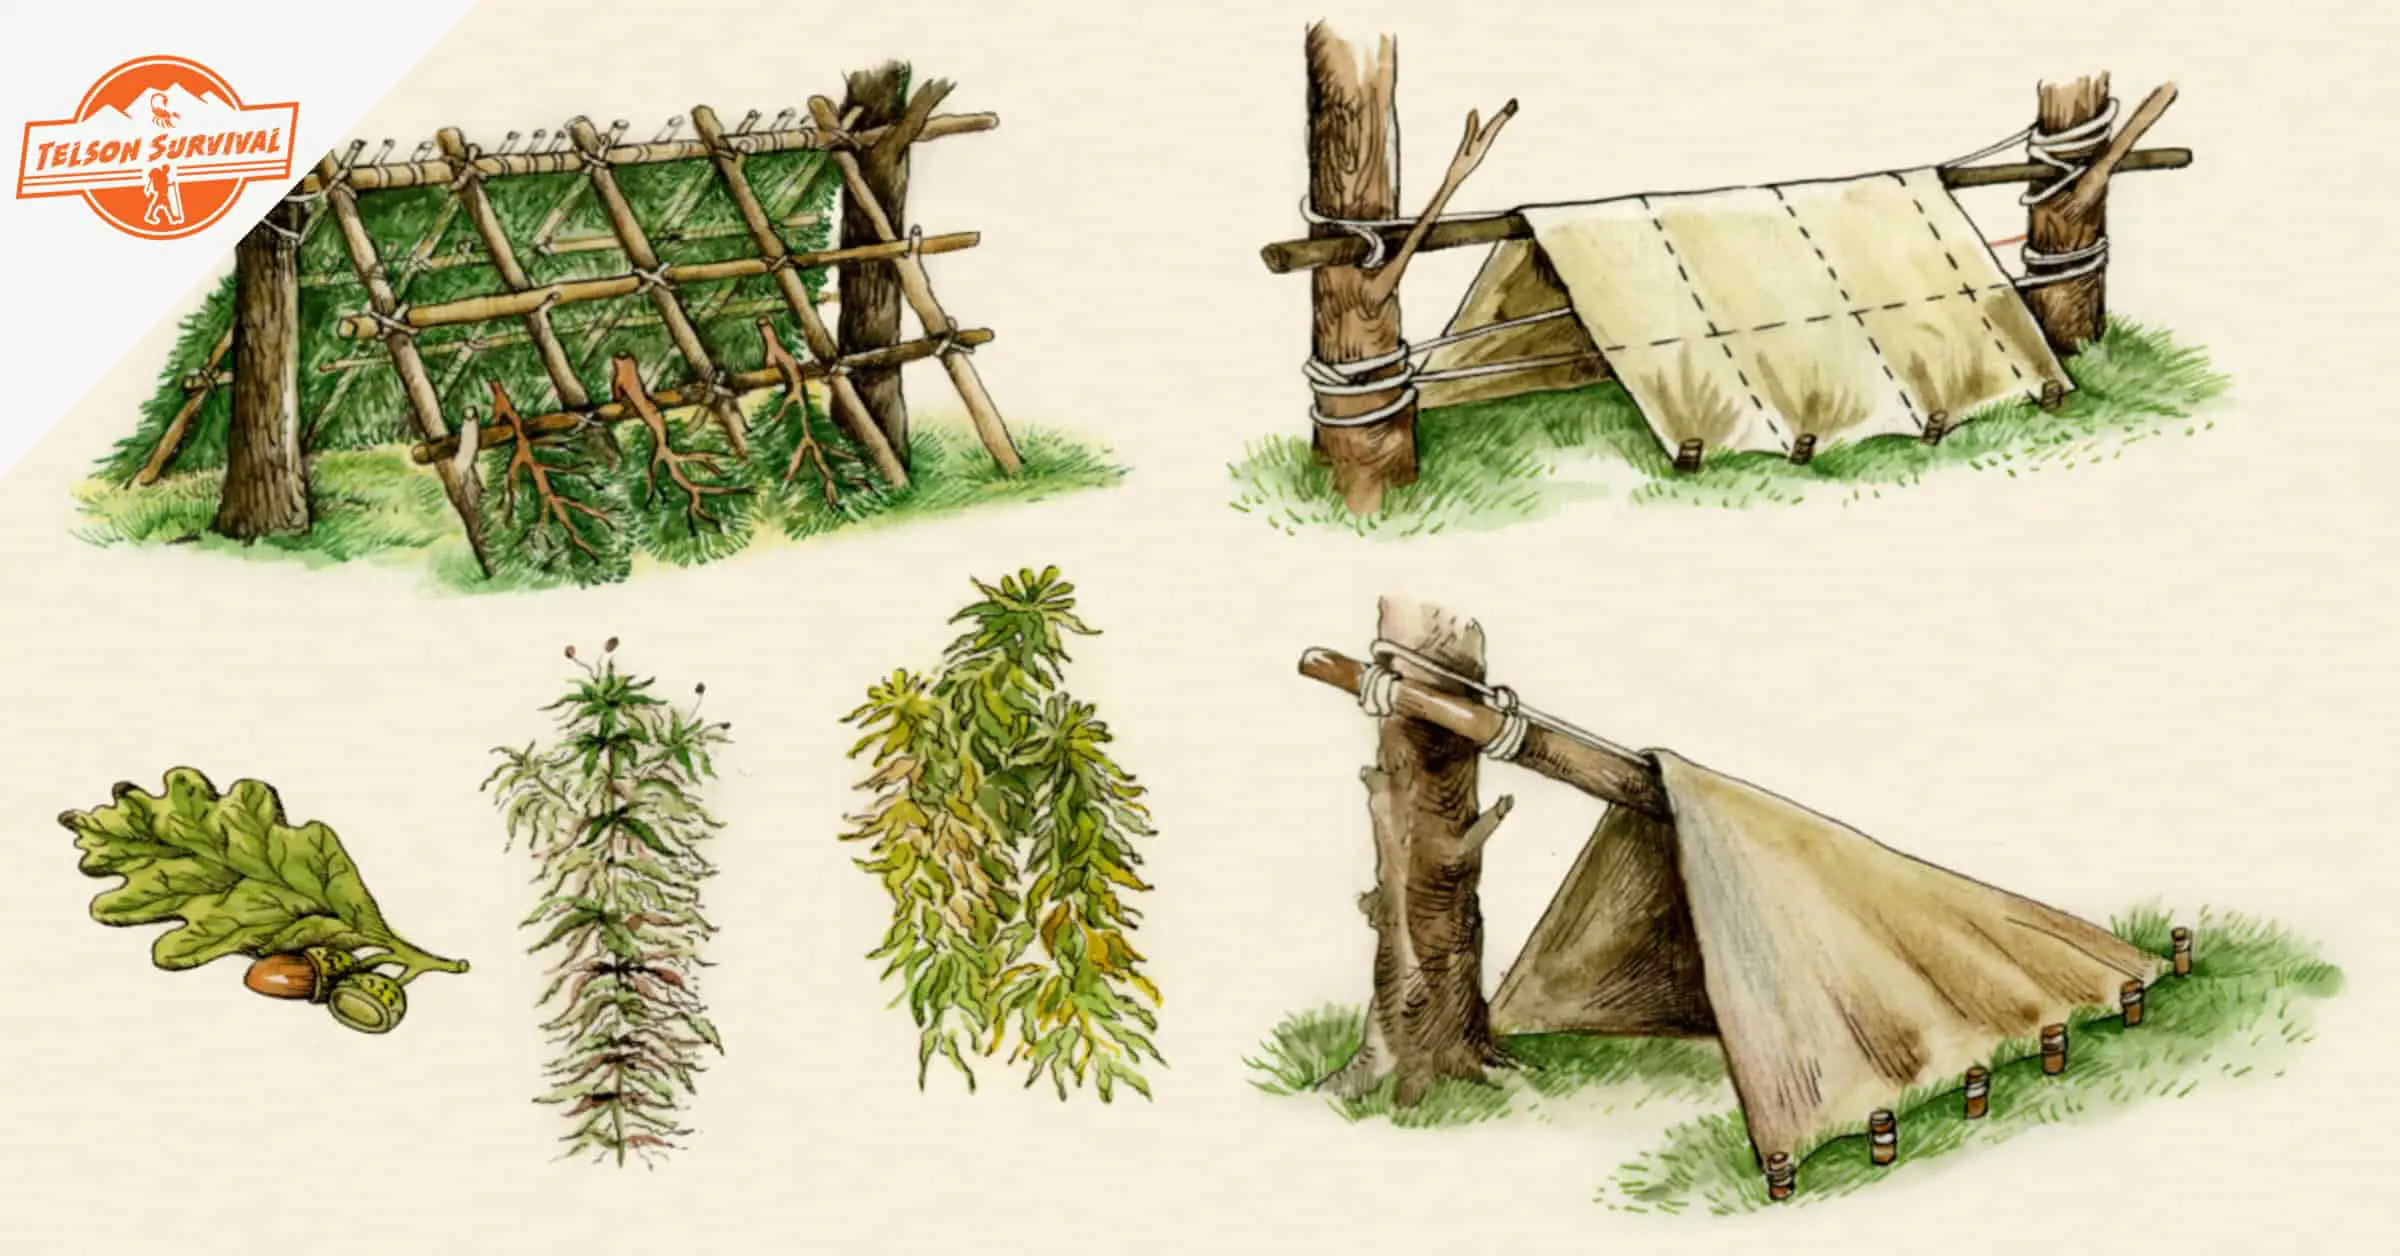
1. Lean to shelter
Lean-to shelters are quick and easy to make. They can be just single-sided or double lean-to. Single-sided lean-to shelters will shield you from wind and rain but not from cold.
Also, if rain or wind changes direction, the single-sided lean-to shelter can become impractical.
Double lean-to shelters are more effective. They will keep you from the rain and wind as long as they are done well.
How to make a lean to shelter:
Firmly support a long pole between two trees by placing the pole between a Y-joint on each tree. Tying a strong rope on the trees or making a firm square lashing to hold the pole on each tree are other options.
Cover one side with poles (for the single-sided shelter) or both sides for the double-sided lean-to shelter so that the poles meet at the ‘lean-to’ pole or rope.
Cover the poles with branches and heaps of leaves, grass, or other types of vegetation so that your shelter is dense and can keep you warm and dry.
If available, a tarp, emergency blanket, or poncho can be used to replace the branches and foliage.
2. Tarp shelters
Tarps are a survival item that we should always keep in our vehicles and carry in our backpacks every time we are out in the wilderness.
If we have to make a survival shelter, a good quality tarp like the Aqua Quest Defender Tarp will save us time and protect us from the extremes of weather elements.
Last update on 2025-01-14 / Affiliate Links / Images from Amazon Product Advertising API
You can make a simple tarp shelter, by tying a rope between two poles or trees and draping your tarp over the rope. To firm it, you can use pieces of cord to tie the corners of your tarp away from you.
This type of shelter will protect you from rain and wind but you might need to make a tarp teepee if you want to be protected from cold and wild animals.
A tarp teepee shelter is a good choice when you are in a group.
How to make a tarp teepee shelter:
Find a few long poles, long enough to accommodate the length of your canvas.
Tie the first 3 poles at the top, leaving a bit of room to prevent the poles from detaching from each other.
Prop the three poles diagonally from the bottom until they are steady and form a teepee shape.
Add the other poles by placing them at different sides between the first three poles and firming them with a rope.
Raise your tarp and wrap it around the poles to complete your tarp teepee shelter. The joint between the poles at the top forms smoke flaps and the space between them will allow in rain. To prevent that, you can place another piece of canvas on top to seal the space.
Since they offer more space, you can make a fire inside the tarp teepee shelter. If you do, leave the entrance open to avoid carbon monoxide intoxication.
This quick video from National Geographic will give you a practical idea of how to make a tarp teepee shelter.
3. A frame lean to shelter
Just like the lean-to shelter, the A-frame shelter is easy and quick to make and uses materials that are readily available in the wilderness.
The name describes the A-shape that the shelter takes at the entrance. The shelter will protect you from wind and rain but you might need a fire at the entrance to generate some heat and keep warm.
Just don’t make it too close to the entrance to avoid intoxication.
How to make an a frame lean to shelter:
Find three sturdy posts; two around 4-5ʺ and another around 10ʺ (or the size that will allow you to lie down in the shelter without leaving part of your body outside the shelter).
Join the two shorter posts in an A-shape so that they cross at the top and make a Y-shape to support the third post. Firmly place the two posts on the ground while creating the width of the entrance that you desire.
Place the longer post on the Y-shape and firm it on a tree on the other end using a strong square lash. You can also place the post on a tree stump or rock if you find one and use smaller rocks or logs to firmly hold it down.
Add posts to make the walls of your shelter by placing one end on the longer horizontal post and striding them out at the same distance with the entrance posts so that your shelter looks even.
Use grass, sticks twigs, and branches to thatch your shelter and fill up the open spaces. The walls of your shelter should be dense enough to protect you from wind and rain and keep you relatively warm. You can create more density to the walls by adding pine boughs, moss, or leaves. Adding these will also make your shelter less noticeable if you don’t want to be discovered.
To be sure no water gets in and create some insulation, you can drape a garbage bag over the horizontal post before adding the wall posts and the foliage.
You can also make a log-bed on the floor and cover it with dry leaves.
This video from Naturally Primitive gives you the detailed process of making an A-frame shelter step-by-step.
4. Snow shelters
Snow acts as an insulating material because of its density and also due to the air that’s trapped in the flakes.
Loose snow has more insulating capacity because it traps more air and so preserves more heat. You can use snow to make any of these types of snow shelters.
Snow trench shelter
The purpose of a snow trench is to create an insulating shelter against both cold and wind. There are two ways to make a snow trench.
First, if you can access compacted snow, you can cut it into blocks, arrange them on the ground in two parallel lines and use more blocks to cover the top and create the trench.
This will, however, require you to have a survival knife or saw that you can use to cut out the blocks.
The second method requires you to dig out a trench, cover it with poles to create the base for the roofing, and then use tree boughs and leaves before creating an insulating top layer with snow.
This method requires less energy than having to cut out snow blocks. Since the ground is moist, the trench can be dug with a stick. The trench must be long enough to cover your body.
Snow cave shelter
This snow survival shelter is made by creating a hollow in a large pile of snow. There are different ways of building a snow cave for survival, but here we describe one of them.
Usually, wind can cause snow to drift and collect into a huge pile in one location. This could serve as the stack for your snow cave when you have to make an emergency shelter in winter.
Alternatively, you can pile up the snow and follow these steps on how to make a snow cave:
Pile up snow to around 5 feet tall and 10 feet long. If your snow cave making was foreseen, you will have a shovel with you. But if yours is an emergency winter shelter, you will need to improvise and use your snowshoes or anything you have on you that could act as a shovel.
Allow the snow to settle and compact so that it stays together and does not separate when you make your cave.
While your snow is bonding, collect the materials you will need to insulate yourself inside the shelter. This could be pine or spruce boughs or even dry leaves.
Begin to dig into the snow by cutting a square shape to mark the entrance and steadily proceed to scoop out the snow to make the cave. If possible, wear waterproof clothes to avoid getting damp and losing the insulation from your clothing, which could predispose you to hypothermia. Also, spread pine boughs on the cave base as you adverse with digging to avoid losing heat from your body through convection and conduction.
Once done, smooth out the top of the cave into a dome shape. This helps to compact the snow on the roof and prevent dripping. Also, you will move better if your cave has a concave finish. If your snow cave is all enclosed, you will need to make a few ventilation holes in the roof and pass a stick now and then to keep them open.
While making your spruce/pine boughs bed, crawl in a few times to compact it. Your bed should be a few inches dense to serve its insulation purpose.
If you stay in the snowy wilderness for more than a night, a more stable snow survival shelter like the igloo is required.
See a different and interesting approach to building a snow cave in this video from Ray Mears on the BBC Studios channel.
Igloo shelter
An igloo takes longer to create than other winter camping shelters but will last you for more than a night as long as temperatures do not rise and melt it.
You also need some tools including a shovel, and a sharp survival knife or saw to cut out snow blocks.
Creating a snow igloo works where there is a good amount of compact snow.
Here’s how to make an igloo shelter:
Find a flat spot.
Draw a circle on the snow, around 12ft (3.5m) in diameter. Improvise the drawing compass by planting a stick at the center and tying a string on another stick, so that the string is half the diameter of your circle.
Shovel out the top layer of snow and dig to create around 2cm-base.
Use a knife or saw to cut out the compact snow into 50cm-long blocks. If you do not have compact snow, you can use a crate to form the blocs but you’ll need to wait for the blocks to compact.
Arrange the snow blocks around the base of the circle, creating a slight angle towards the inside.
Stack the blocks gradually until you complete the roof in a dome shape.
Dig out 2 or 3 blocks at the point where you want to create the entrance. Ensure your entrance is against the wind.
Seal off the gaps between the blocks with loose snow and smooth the roof inside to avoid any drop falling on you.
A tree pit snow shelter
A tree pit is another winter survival shelter that you can consider. With this type of shelter, you already have the basic structure for your shelter naturally done for you.
It means that you find a tree whose trunk is buried a few feet by snow. You then dig out the snow around the tree trunk to create a hollow and cover the bottom with pine boughs and leaves to create an insulation bed.
You are already covered by the tree’s canopy but you’ll need to use branches and leaves to cover the top of the pit. This will preserve the heat inside and prevent any snow on the tree falling on you.
5. Debris shelter
A debris hut survival shelter is an optimal short-term survival solution. They take little time to make and will protect you from the elements.
You only need a stick frame, a thick debris wall, and a debris bed.
Here are the simple steps on how to make a debris shelter:
Find a strong stick, a little taller than you, to serve as the ridgepole.
Find two other sticks with a height that reaches around your waist. Cross them to create a Y-shape to support the ridgepole and fix them to the ground so that you form a triangular shape to serve as the opening to your shelter.
Fit one end of the ridgepole on the Y-shape to form a pyramid shape. You can support the other end of the ridgepole with rocks or logs so it stays firm. Try lying down below the ridgepole to ensure you fit comfortably.
Build the ribs of your shelter by placing plenty of sticks on the ridgepole. Close as much space as you can so that the roofing debris will stay at the top.
Place some twigs on the sticks and create dense roofing with debris from leaves, pine needles, or moss. This will ensure your shelter does not let in rain and preserves the warmth inside the hut.
Finally, use more debris from pine needles and leaves to make your bed on the floor of your hut. Your shelter is now done and ready for occupation.
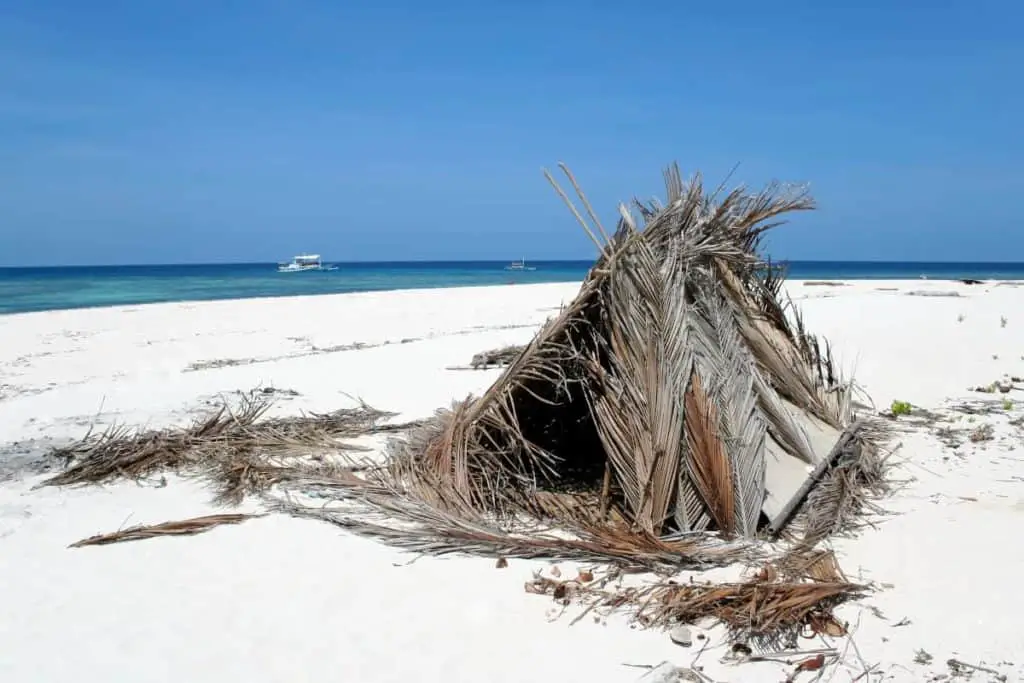
6. Desert survival shelters
Desert survival shelters are the most difficult to create. This is because there is hardly any natural material to create a shelter.
But what if you found yourself stuck in a desert anyway? How do you protect yourself from the wind and heat of the bare land?
The most you have for resources to make a survival shelter in a desert is the desert shrubs. If you are lucky, you might find some greener foliage around an oasis.
You may also find some cactus or other desert succulent plants. But you need shelter because the heat is draining and the temperatures may fall drastically in the night.
A good way to survive in the desert is by making a trench shelter. Here’s how to make a trench shelter:
First, collect any foliage or dry shrubs that you can found. Do so indiscriminately so that you have enough for your shelter.
Find a suitable location for your shelter. A spot behind a hill and against the wind is your best bet.
Dig a trench, long enough to fit your height and wide enough to leave some room when you lie down.
Pile the earth from the trench into three mounds on each side to create wind-protection walls. Leave the remaining side to serve as an entrance.
Place any sticks or logs you have found on top of your trench and cover it with the foliage or debris.
Cover everything up with some of the earth while leaving the entrance open. You can use some of the no-thorn foliage to cover the floor of your trench so you have protection from the soil when you sleep.
If you were lucky to bring a tarp you can use it to make an open shelter but that will not protect you much from the cold desert nights.
7. Dugout survival shelters
Emergency dugout shelters are all-purpose. It means that they will not only protect you from the elements but also wild animals.
They are also great if you are looking for a survival hideout.
See a practical example on how to build a dugout shelter in this video from Primitive Lifeways.
Follow these steps to learn how to make a dug out survival shelter:
Identify a suitable spot for digging, one where the soil is not sandy to the extent it can easily slide down. A compact type of soil is more secure. Also, avoid digging close to a body of water in case it finds its way into your dugout shelter.
Dig a furrow around 4ft deep or big enough to fit. You’ll need a sharp tool to break the ground and a shovel to remove the soil.
Create a bed on the floor of your dugout shelter by adding twigs and leaves. These will also serve as insulation for your body.
Place logs over the furrow and add twigs, leaves and other debris to cover up your dugout shelter. Ensure your entrance/exit is clear. You can set up a bonfire at the entrance to generate some warmth in winter.
If your stay in the wilderness is long, you can use wood to make your dugout shelter like a little hut, both for the walls and the roofing.
You’ll need to improvise some type of cordage to tie the wood together. You can then use grass and debris to cover up your shelter.
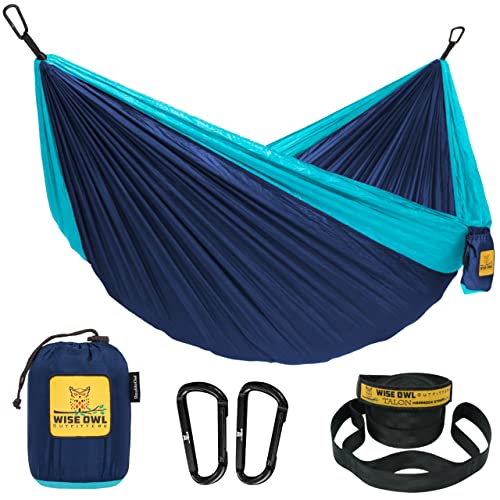
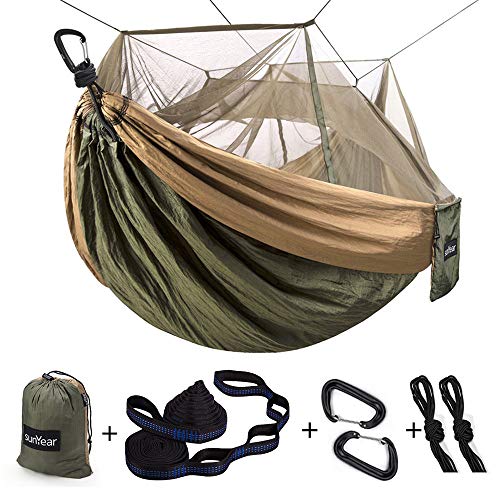
8. A hammock survival shelter
A hammock survival shelter is a variation of the tarp shelter. It is best used in the jungle where survival includes keeping away from creepy animals and insects.
Last update on 2025-01-14 / Affiliate Links / Images from Amazon Product Advertising API
With these hammocks, all you need to do is hook them to strong branches on two trees and you have your shelter done for the night.
If you have a tarp, you can also improvise to make a hammock shelter. Simply suspend your tarp by tying the corners to four strong trees.
This design will require you to have some kind of bedding especially if it is cold.
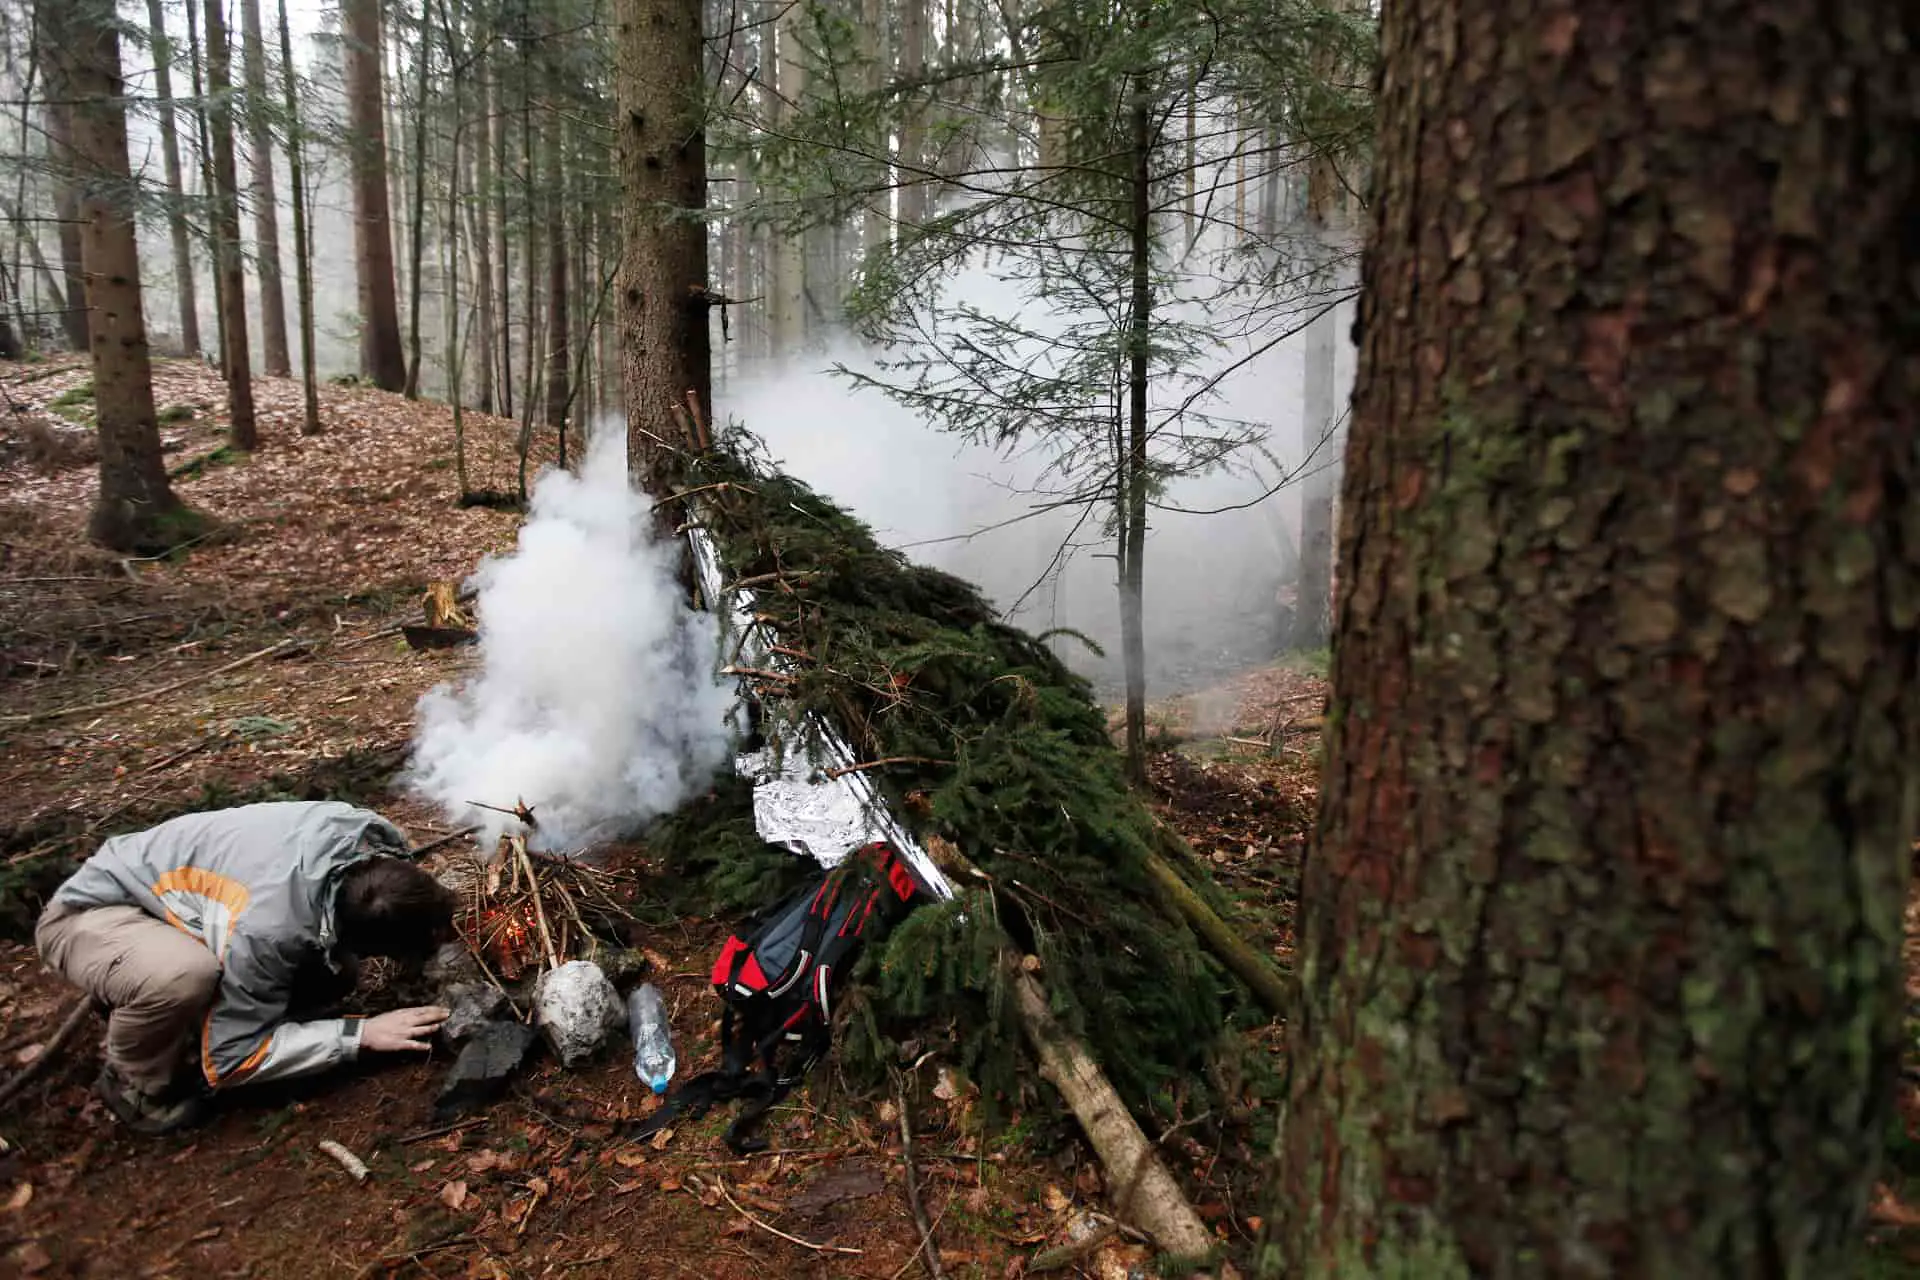
9. Tree shelters
Fallen or standing trees can save you time if you have to make an emergency survival shelter. You can do this in different ways.
One way is by using the bark of a fallen tree as support for your shelter. In this case, you will collect sticks and foliage and lean the sticks on the fallen tree to create the ribs of your shelter.
You then cover the sticks with foliage and debris to keep out rain and the cold breeze.
A fireplace near the shelter will keep you warm. Just be sure to shield it from foliage with some mud so it does not cause a wildfire.
If the fallen tree is lying too low, you can use some rocks or logs to lift it on the slimmer side.
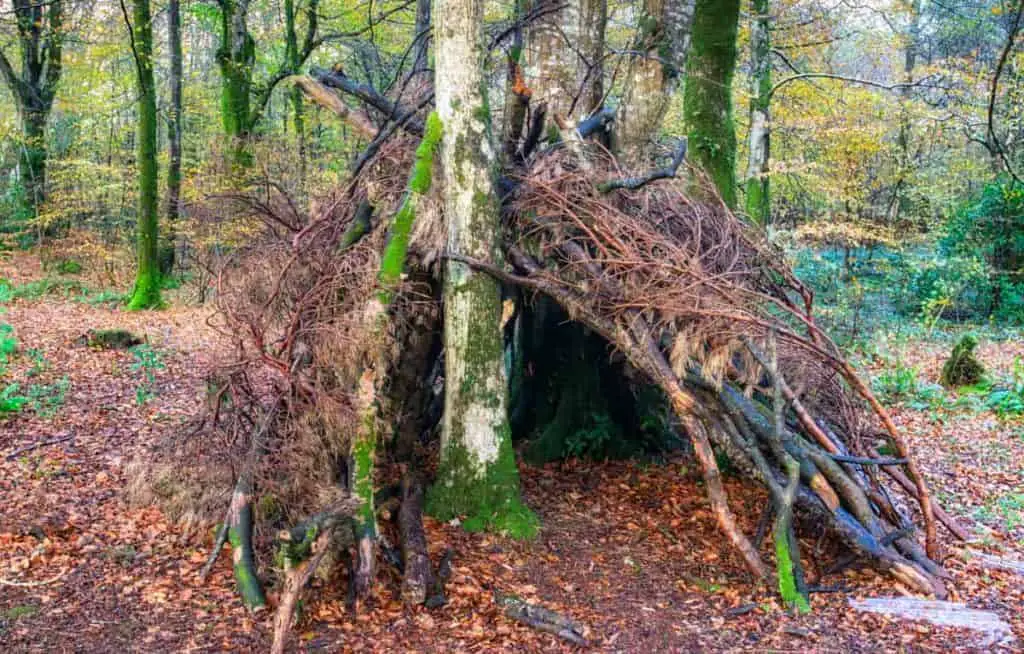
Another way you can use a tree is by identifying a large-trunk tree and using it as support for the sticks you use to make a shelter.
You will still use twigs and leaves to make the roofing, but one advantage with this is that the branches of the tree already provide some shield if it should rain.
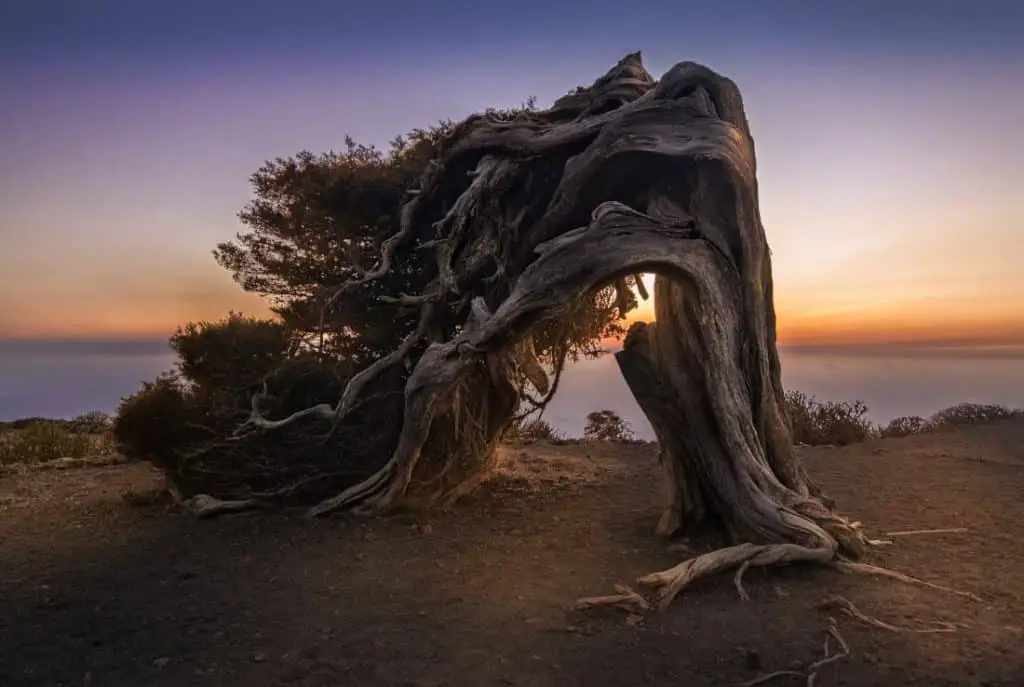
A common form of tree shelter is the juniper tree survival shelter. The juniper or cedar tree has cone-shaped leaves and a dense trunk.
Since it is known as a tree that can be easily transformed into a natural shelter, you may find one that has already been used by others and simply adapt it to fit your need.
If you find a juniper tree that is bent over like the one in the below image, you can simply use some of its branches to create a lean-to or a double lean-to shelter. Its soft foliage will also make a comfortable bed on the floor of your juniper tree shelter.
10. Long term survival shelters
If your emergency survival scenario escalates into a disaster situation or crisis, it is time you considered a long-term survival shelter.
This will cost you a lot of time and energy and you’ll need to have learned some keys skills beforehand.
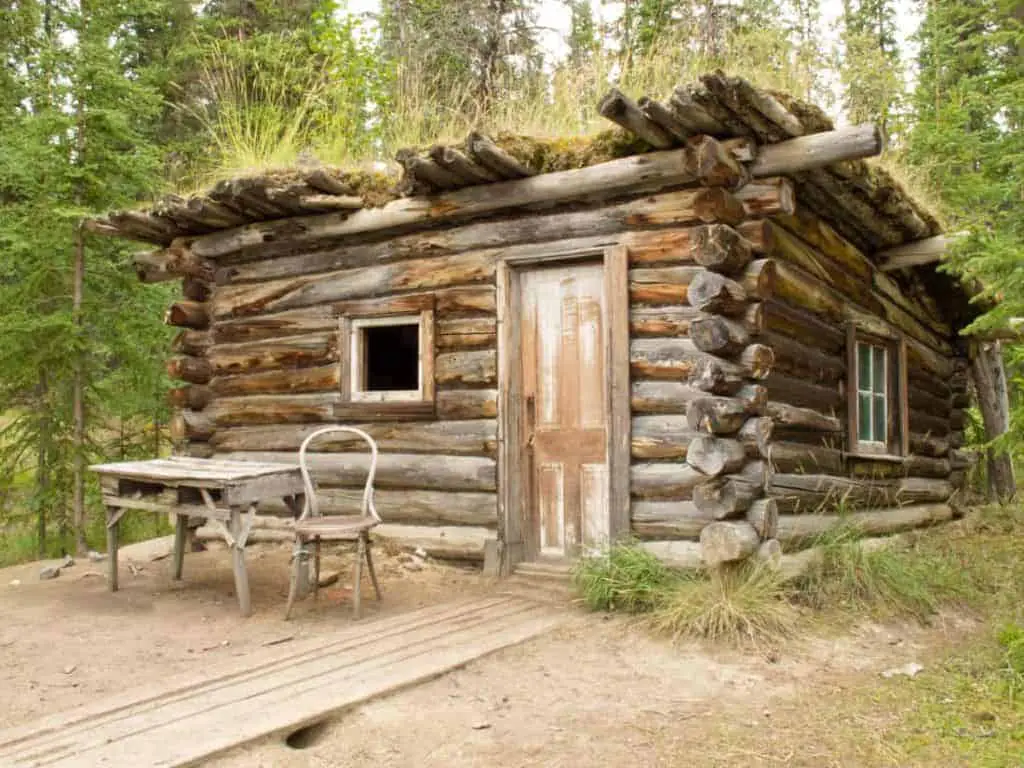
A reliable design you can consider is a log cabin.
Here’s a step-by-step guide on how to make a log cabin:
Clear the spot where you want to make your cabin of grass and other low growing shrubs and level the ground, adding a bit of sand to facilitate drainage.
Find large longs or rocks to support your cabin off the ground. You will need to plant them partly to the ground to ensure they are stable.
Collect as many logs as you need for the cabin and commence your construction. Since you have no nails, the best way is to interlock the logs by cutting out a trough on each side of every log and interlocking it with the previous one until your wall is done.
You can use the same interlocking skill to make the roof or use smaller sticks that you can tie with a cord from the wild. Cover the sticks with twigs, pine boughs, and grass to create insulation.
If your wall logs have spaces between them, you can use mud to seal them off.
Use the square lashing skill to prepare a door by tying several small sticks placed horizontally on two parallel sticks. Then use some wild cord to tie your door to the entrance.
If you have enough space, you can create a fireplace with rocks inside the shelter or place it at the entrance.
11. Natural shelters
If you are in a last-minute survival situation – say you are lost and have not time to make a real shelter because it is getting dark or it’s going to rain in the next few minutes – naturally appearing survival shelters are your quickest option, even though that depends on whether you can find one.
The easiest natural shelter you can find is a tree with low-lying foliage.
Some trees like the spruce and the pine have extremely dense canopies and will remain completely dry after a storm.
Sheltering under such trees will save you from getting wet and losing the insulation from your clothing.
Low lying trees with dense foliage can also keep you from direct exposure to falling snow and create a natural snow cave with insulation from the snow on the leaves.
Another naturally appearing survival shelter is a cave.
Caves will protect you from all the weather elements including cold, heat, rain, and wind.
Since temperatures stabilize a few feet under the ground, a cave will keep you warm in winter and cool in summer.
Because of their natural structure, caves would also make a perfect winter survival shelter with a fireplace. You do not risk burning the materials used to make the shelter as in the case of other survival shelters
The only problems you may have with caves are flooding, getting infested by animals like bats, or collapsing. It’s important to assess the cave for these dangers before making it your survival habitat.
Also, always stay as close as possible to the entrance in case you have to escape from an emergency situation.
Other types of naturally appearing survival shelters include thickets, hollow trees, and rock overhangs among others.
Wilderness Survival Shelters Conclusions
If you find yourself in the wilderness, whether you are lost or are there for a planned escapade, protecting yourself from the extremes of weather elements is crucial.
This means learning some skills for making extreme weather survival shelters before you find yourself in a survival situation.
Identifying an appropriate situation and knowing your wilderness survival shelter needs will precede your choice for a specific survive shelter design.
You can then choose snow shelters such as a snow cave in winter, dig a trench in the earth if you are in a desert, or make an a frame shelter in the jungle.
Whichever choice you make, surviving the extremes of weather is your ultimate purpose, which makes the strain of making the survival shelter worth the effort.
Whether you need your survival scissors in an emergency situation or for ordinary survival tasks while hiking or on an off-grid escapade, EMT shears will be a great addition in any prepper Bug Out Bag.
We’ll tell you everything about this 6-in-1 multi-tool in this article! We review the features, tools, and accessories of the Leatherman Raptor, its uses, how to sharpen it when it dulls and if it’s worth the hefty price for preppers!
Off grid preppers need a solar water heater because it is a cheap option to get hot water. In this article we discuss their benefits and disadvantages and explore the best options for off grid solar water heaters.
During a catastrophe, preppers must be able to anticipate a bunch of key survival needs. Communication is vital in this, and a police scanner can help you stay one step ahead of everyone else.